Introduction
Fatigue Intervention plans are used by monitoring centre analysts to understand who to contact when a notifiable event occurs.
This chapter outlines the key flows required to manage a Fatigue Intervention Plan as an Account or Fleet administrator.
Account or Fleet plans – enable & disable
Intervention plan can exist at the Account or Fleet level. Account level plans need to be enabled and activated by Host or Service Provider admins.
Fleets can choose to use the Account plan or create their own Fleet plan. By default, Fleets will use the Account plan. Where the Account plan has been enabled, customers can enable and manage their Fleet plans.
Once a plan is enabled, customers can create and manage rosters themselves.
The details of how to manage Account and Fleet Plans are outlined in this chapter.
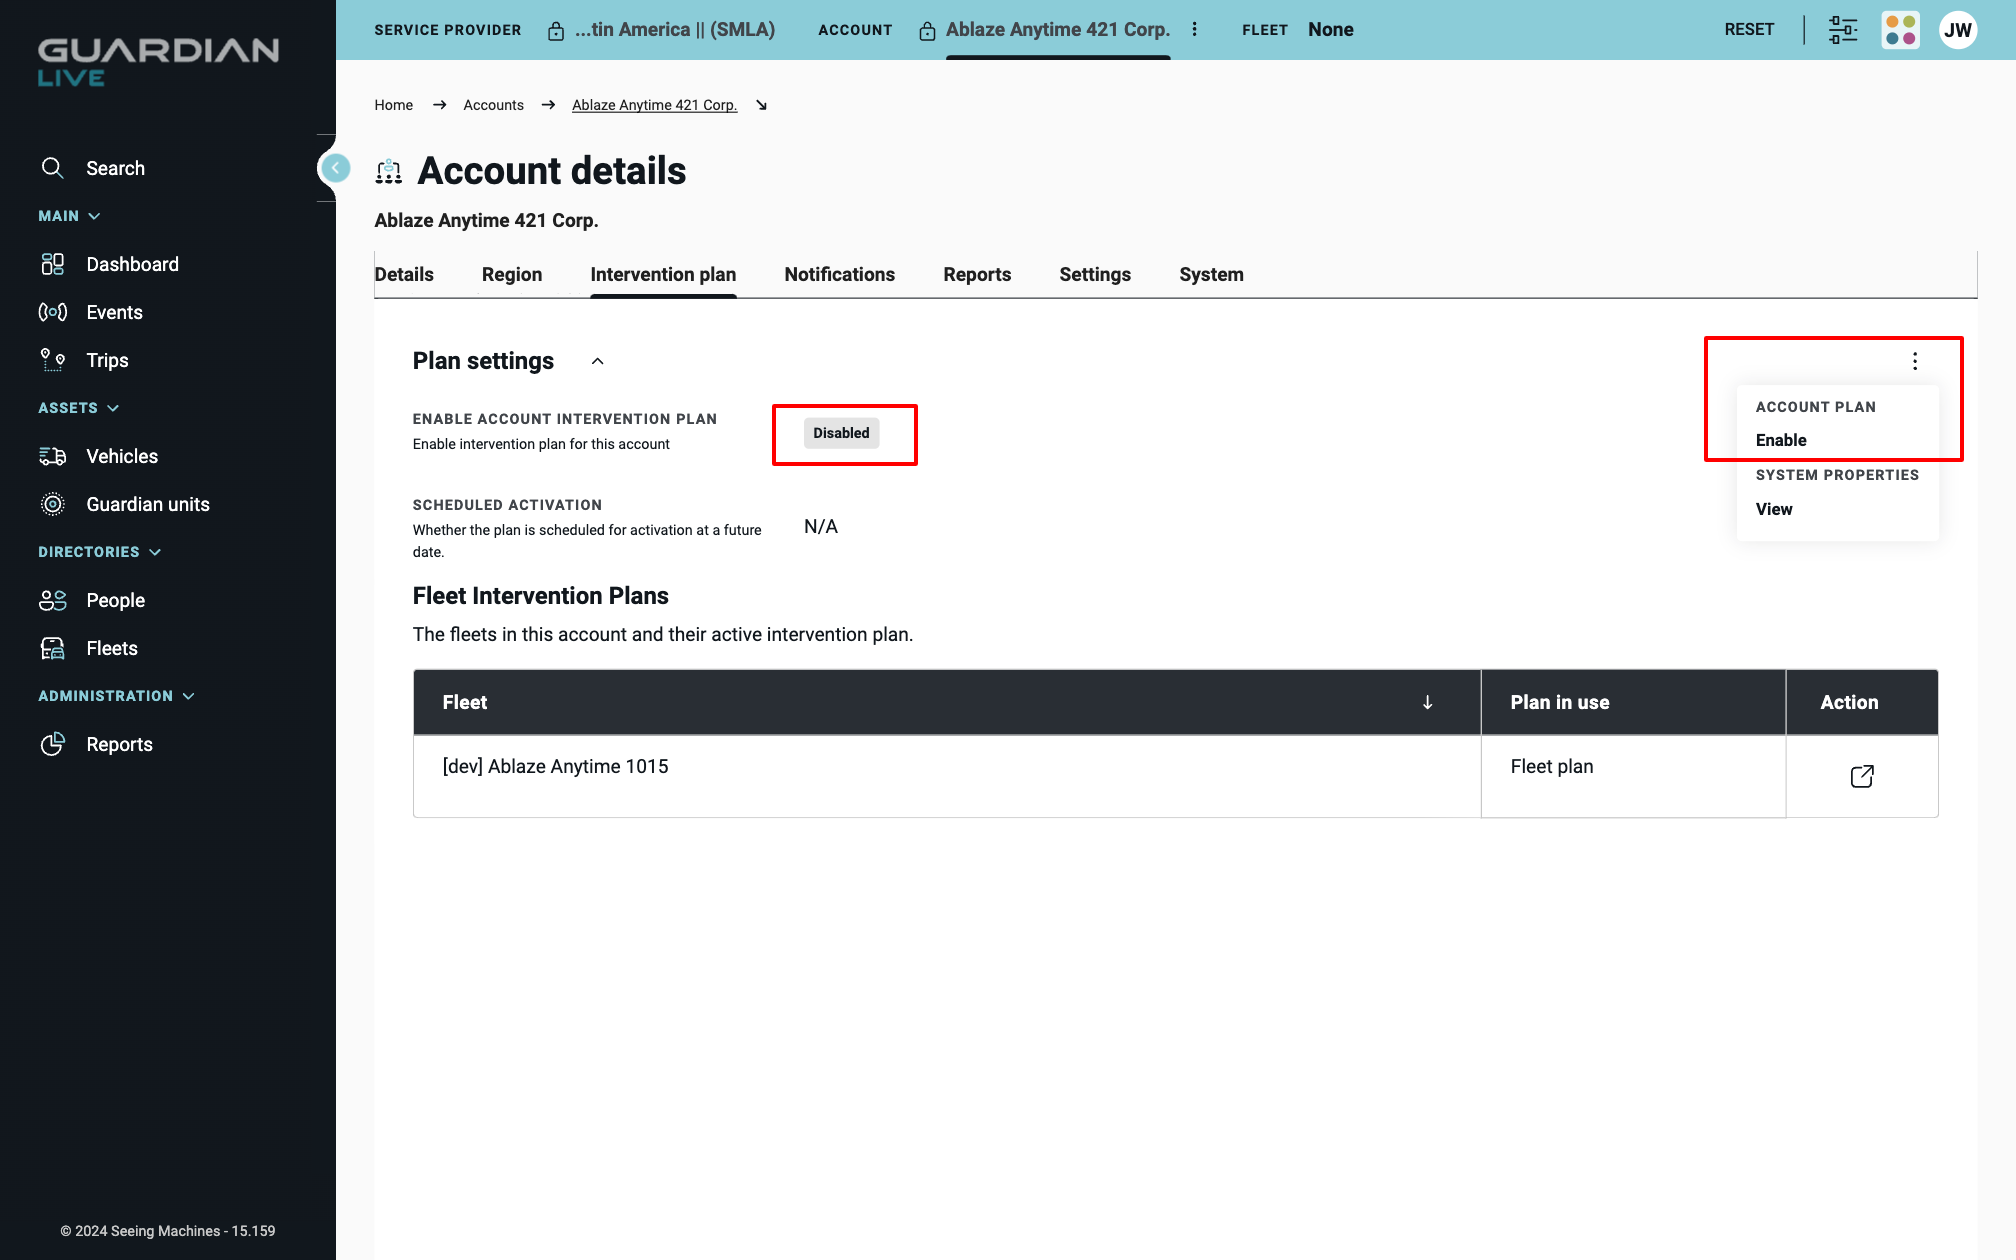
Enable Account plan
To enable an Account plan…
[ ! ] Note: If it is the first time the plan is being enabled and the status is “not specified”, this can only be done by Host or Service Provider administrators.
- Navigate to the “Accounts details” page. From the “Dashboard”, tap “Details” under the account name.
- From the “Account details” page, navigate to the “Intervention Plan” tab. [ ! ] Note: Only Accounts with a “Pro” or “Max” service-tier will have this tab.
- Within the “Intervention Plans” tab, you should see “Plan Settings”. The “enable account intervention plan” status will be “disabled”.
- Tap the menu denoted by three dots and select “Enable”.
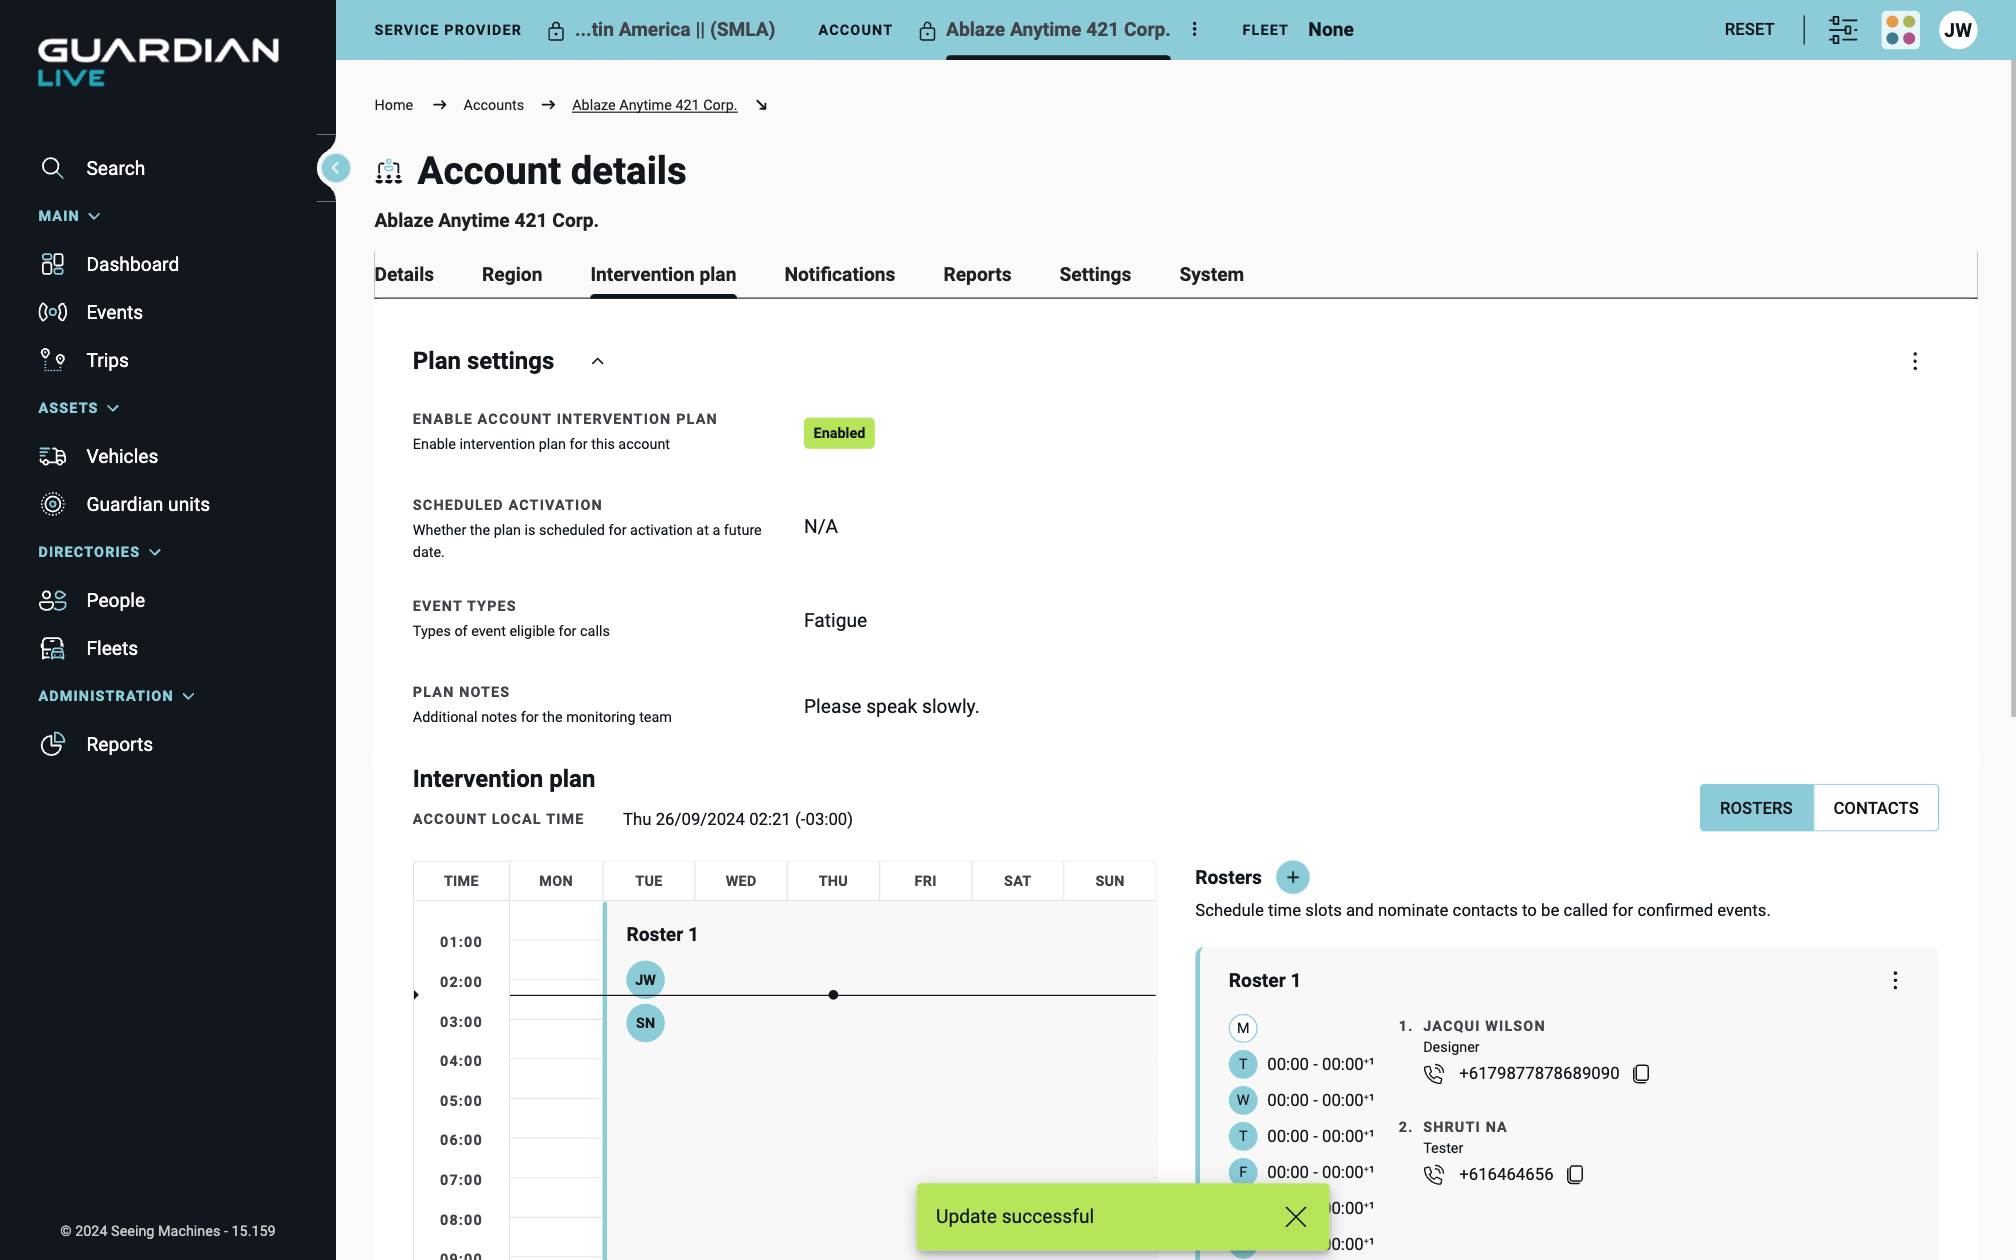
- The Account plan will be enabled.
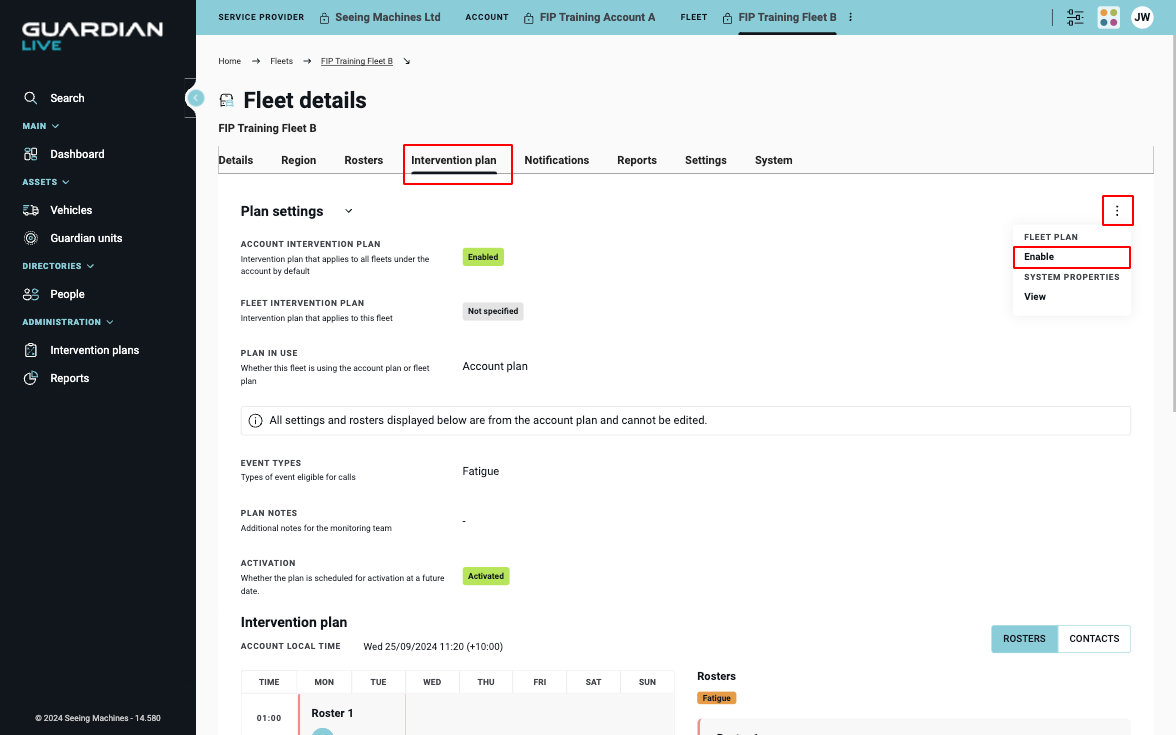
Enable a Fleet plan
[ ! ] Note: Fleet admins can only enable their own Fleet plan in cases where the Account plan has been activated by a Host or Service Provider.
To enable a Fleet plan as an Account admin…
- Navigate to the “Fleets” page from the left-hand panel. This should load a list of Fleets.
- Find the Fleet you are interested in and select it from the list.
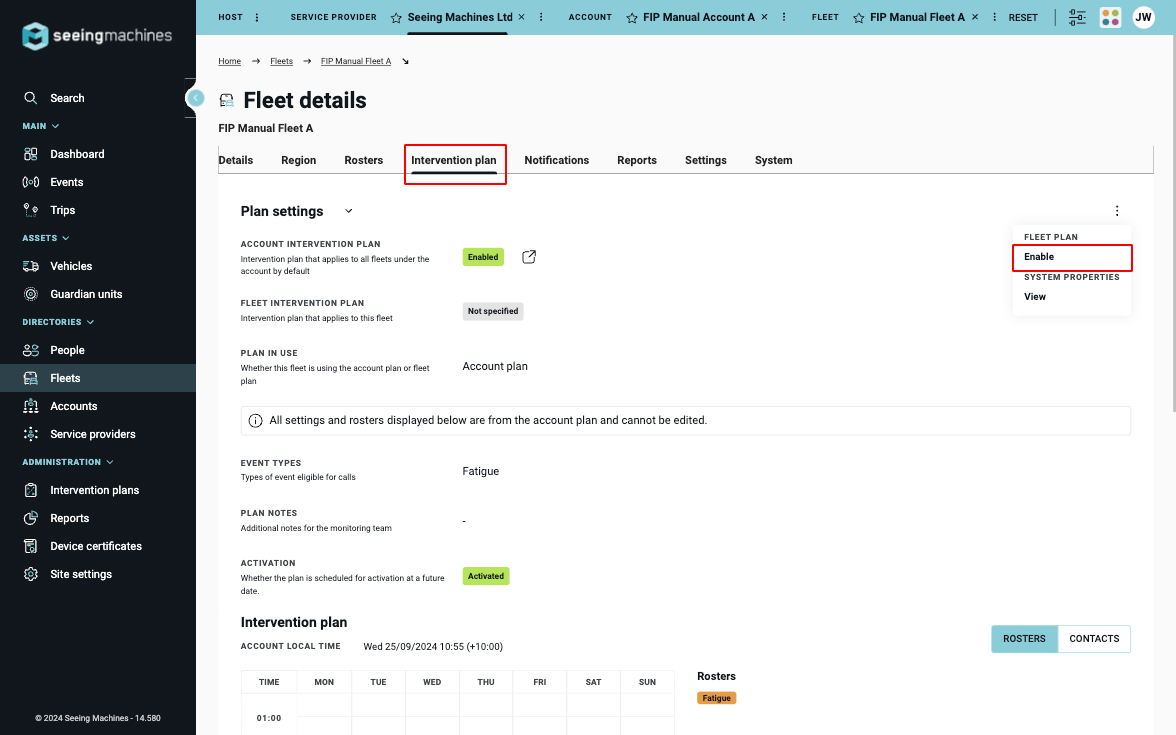
- From the “Fleet details” page, navigate to the “Intervention Plan” tab. By default, a Fleet will use the activated Account plan.
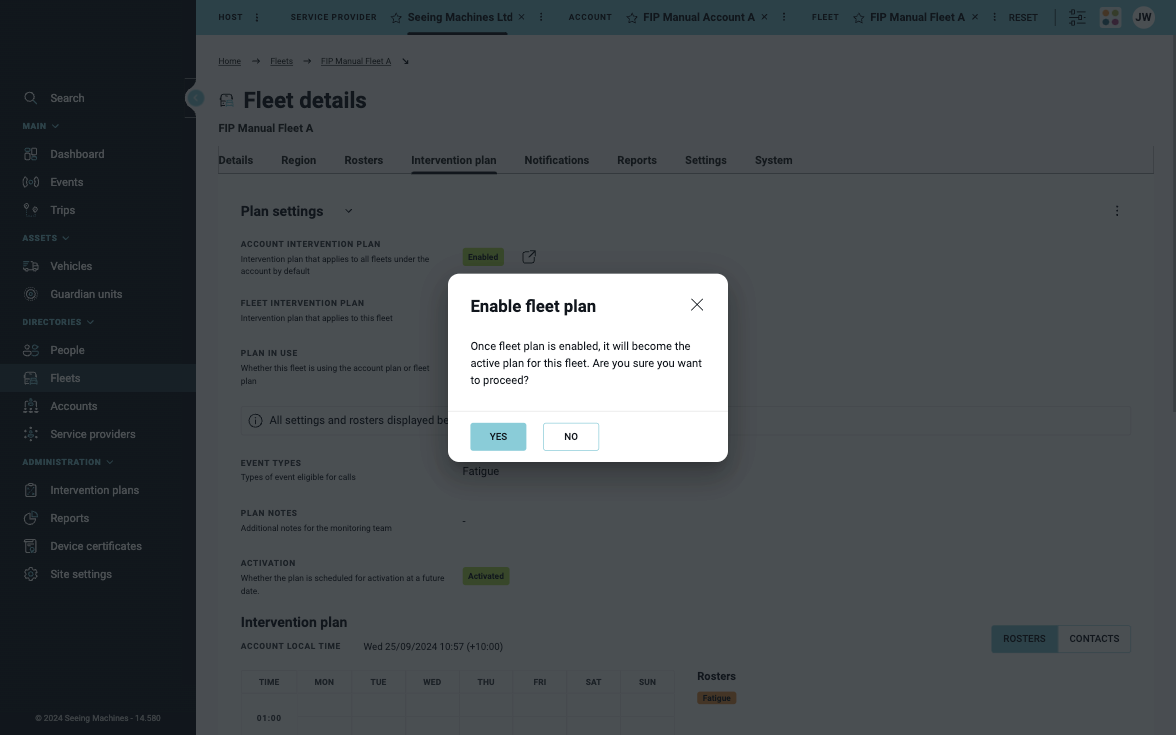
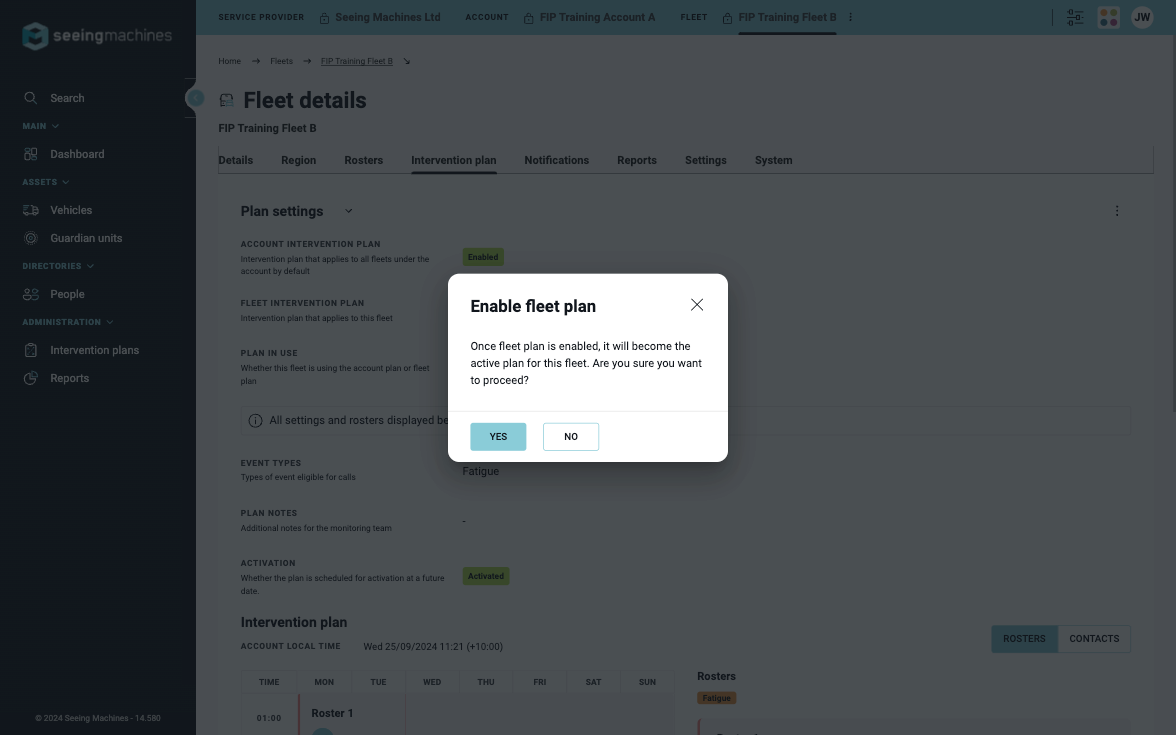
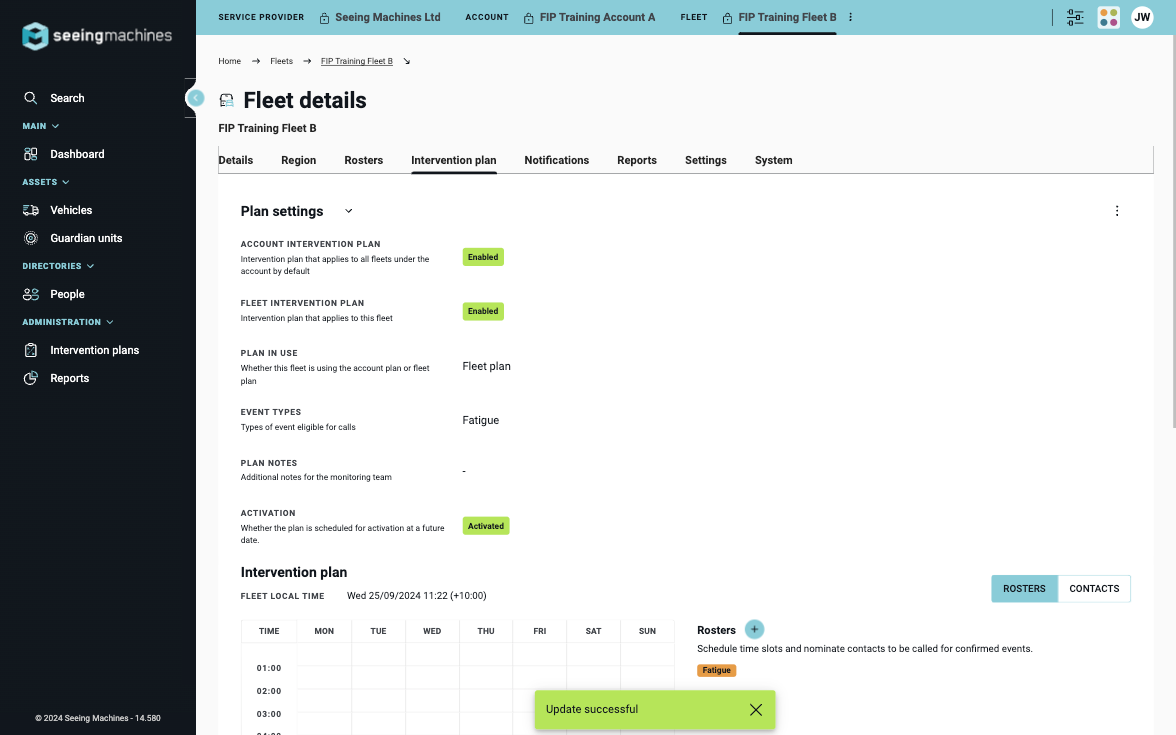
- From “Plan settings” select the menu denoted the three dots. Select “Enable”.
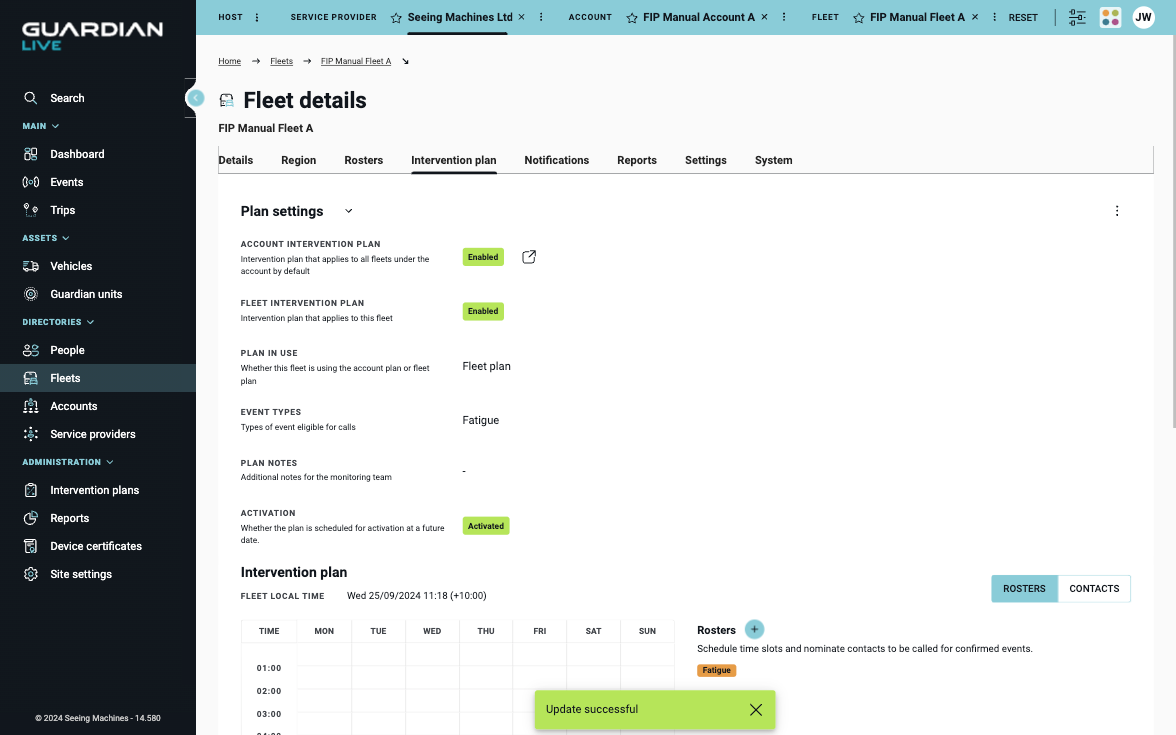
- Once the plan is enabled, it will become the active plan for the Fleet.
To enable a Fleet plan as a Fleet admin…
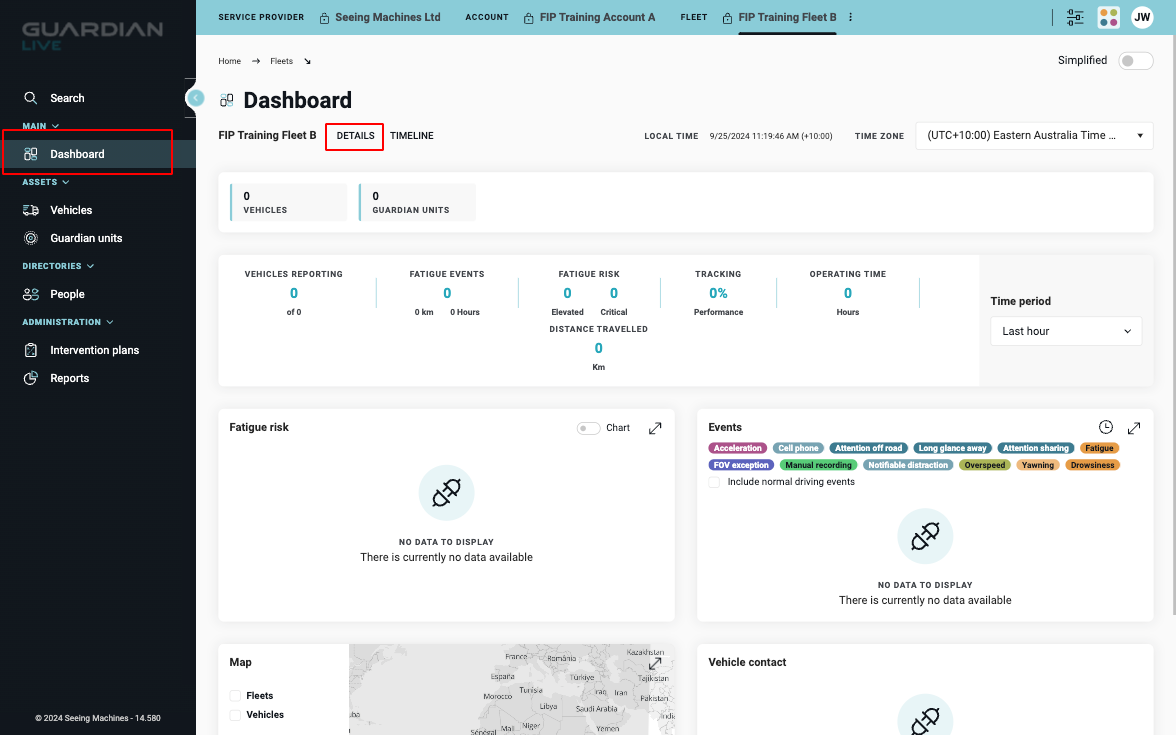
- Navigate to the “Dashboard” within Guardian Live.
- Under the heading “Dashboard”, you should see the Fleet name. To the right of the Fleet name there is a button with the label “Details”.
- Select “Details” to load the “Fleet details” page.
- Navigate to the “Intervention plan” tab.
- From “Plan settings” select the menu denoted the three dots. Select “Enable”.
- Once the plan is enabled, it will become the active plan for the Fleet.
Disable plan
Disable an Account plan
An Account plan can only be disabled by a Host or Service Provider admin.
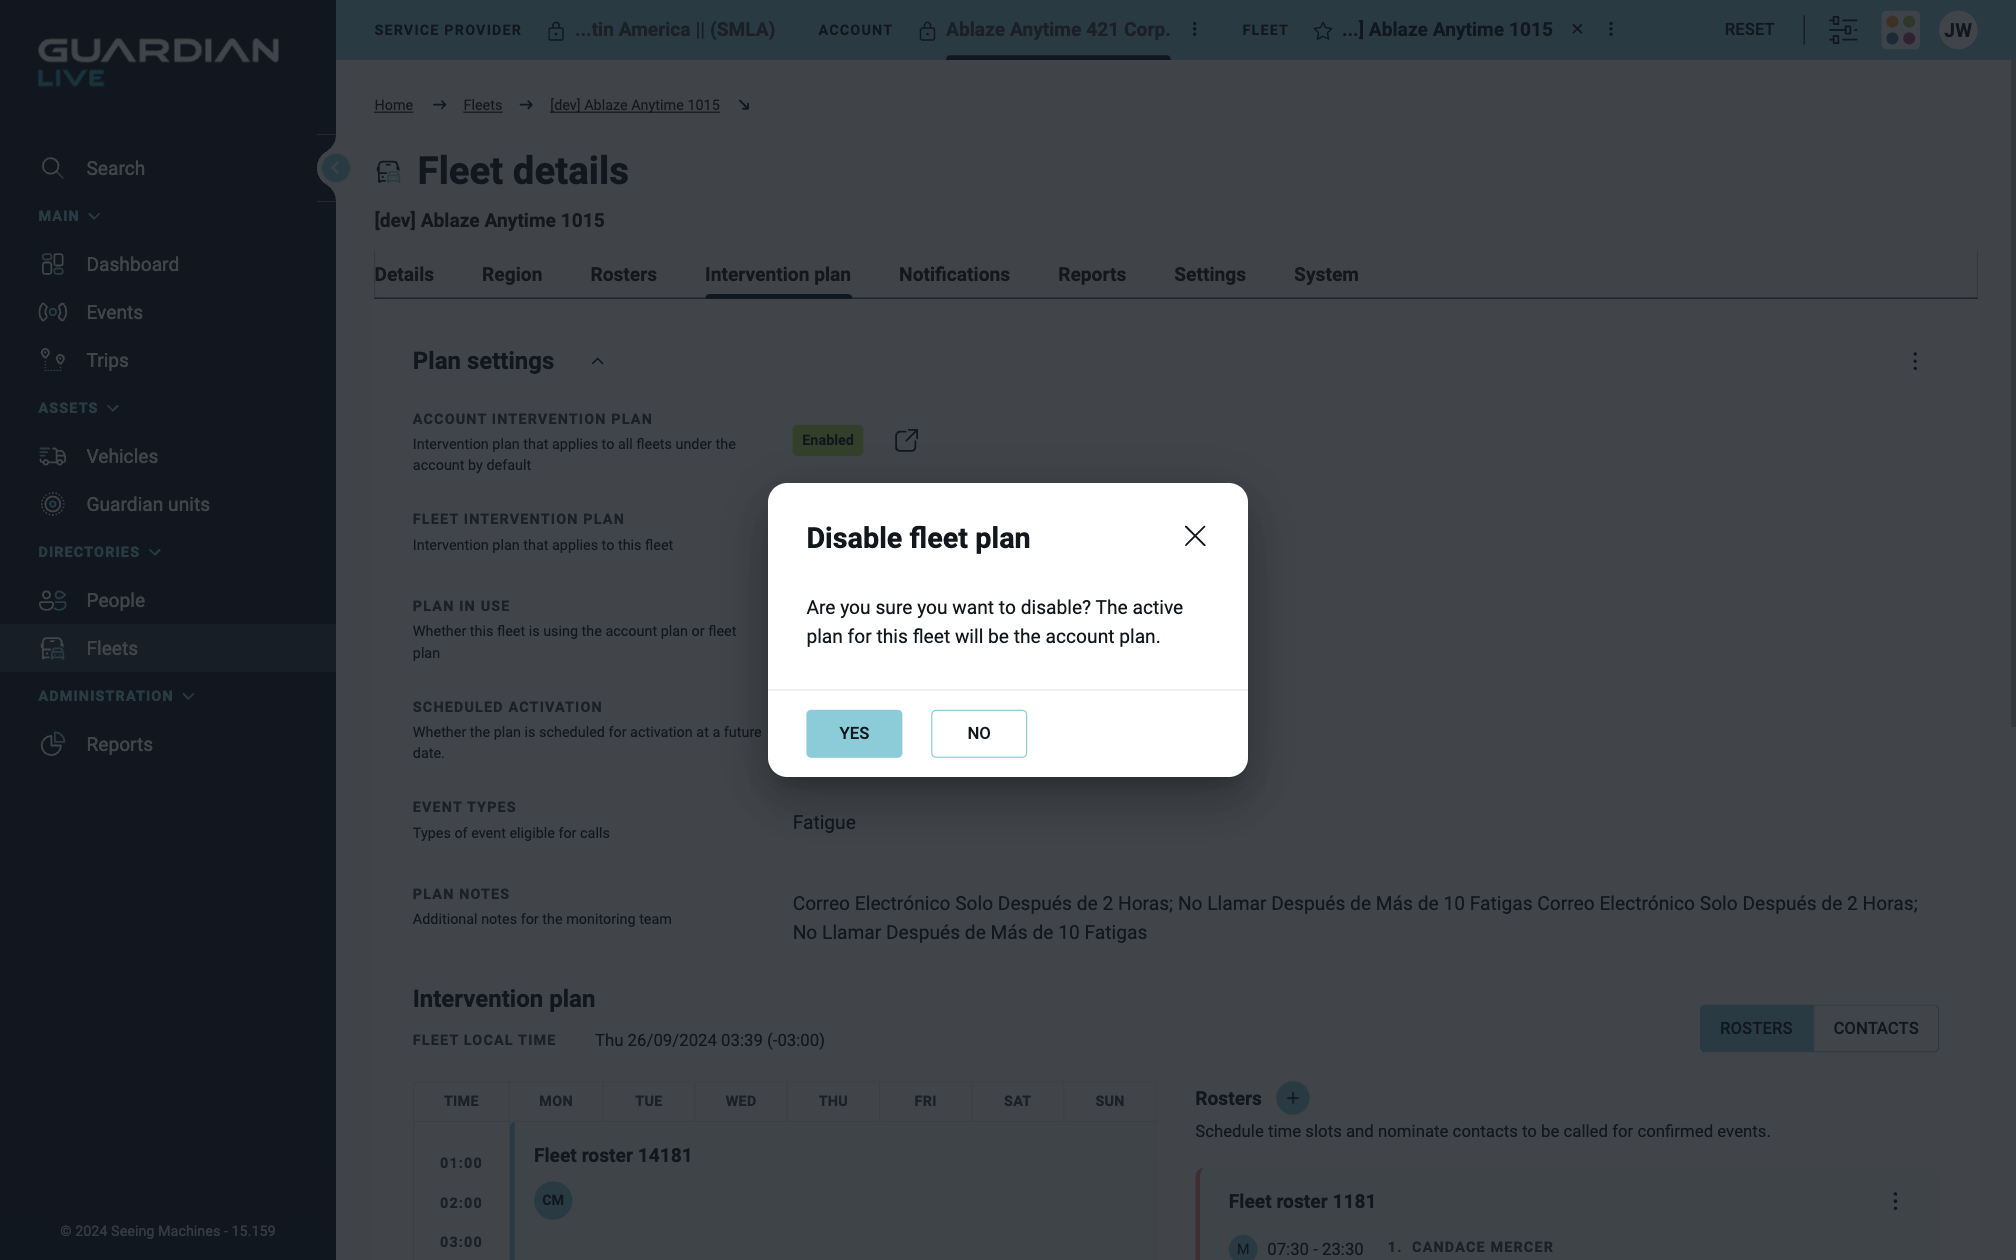
Disable a Fleet plan
In cases where there is an enabled Account plan, Fleet or Account admins can disable the fleet plan. For all other cases, a Host or Service Provider must make this change.
When the Account has an active plan, disabling the Fleet plan will revert to the Account plan.
When the Account plan is disabled, disabling the Fleet plan will leave the Fleet with no plan.
To disable a Fleet plan…
- From the “Fleet details” page, navigate to “Intervention plans”. At the top of this tab you will see “Plan settings”.
- Tap the menu denoted by the three dots. Select “Disable”.
- Review the information in the confirmation dialogue and select “yes” to confirm.
- The Fleet plan will now be disabled.

Rosters – view and edit
A Roster is used by monitoring centre analysts when a notifiable event occurs.
It outlines who in an Account or Fleet they should call, and in what order depending on the day and time.
Rosters exist within the context of a “Plan” which can be created at either the Account or Fleet level. For more information on plans, see “Account or Fleet plans – Enable & disable” earlier in this article.
A plan can have multiple rosters but they cannot overlap. The details of how to manage Rosters are outlined in this chapter.
Who can view and manage rosters?
Access to rosters is controlled at the Plan level. If a user has access to an Intervention Plan, they will be able to see the roster.
The access will differ depending on the user’s Guardian Live scope and grant.
- Hosts or Service provider admin: Can view and edit the plans of any associated Accounts or Fleets.
-
Account admin: Can view and edit their Account plan and the plan of any associated Fleets.
-
Fleet admin: Can view and edit their own Fleet Plan and its rosters.
View rosters
View Account roster as an Account admin or elevated user
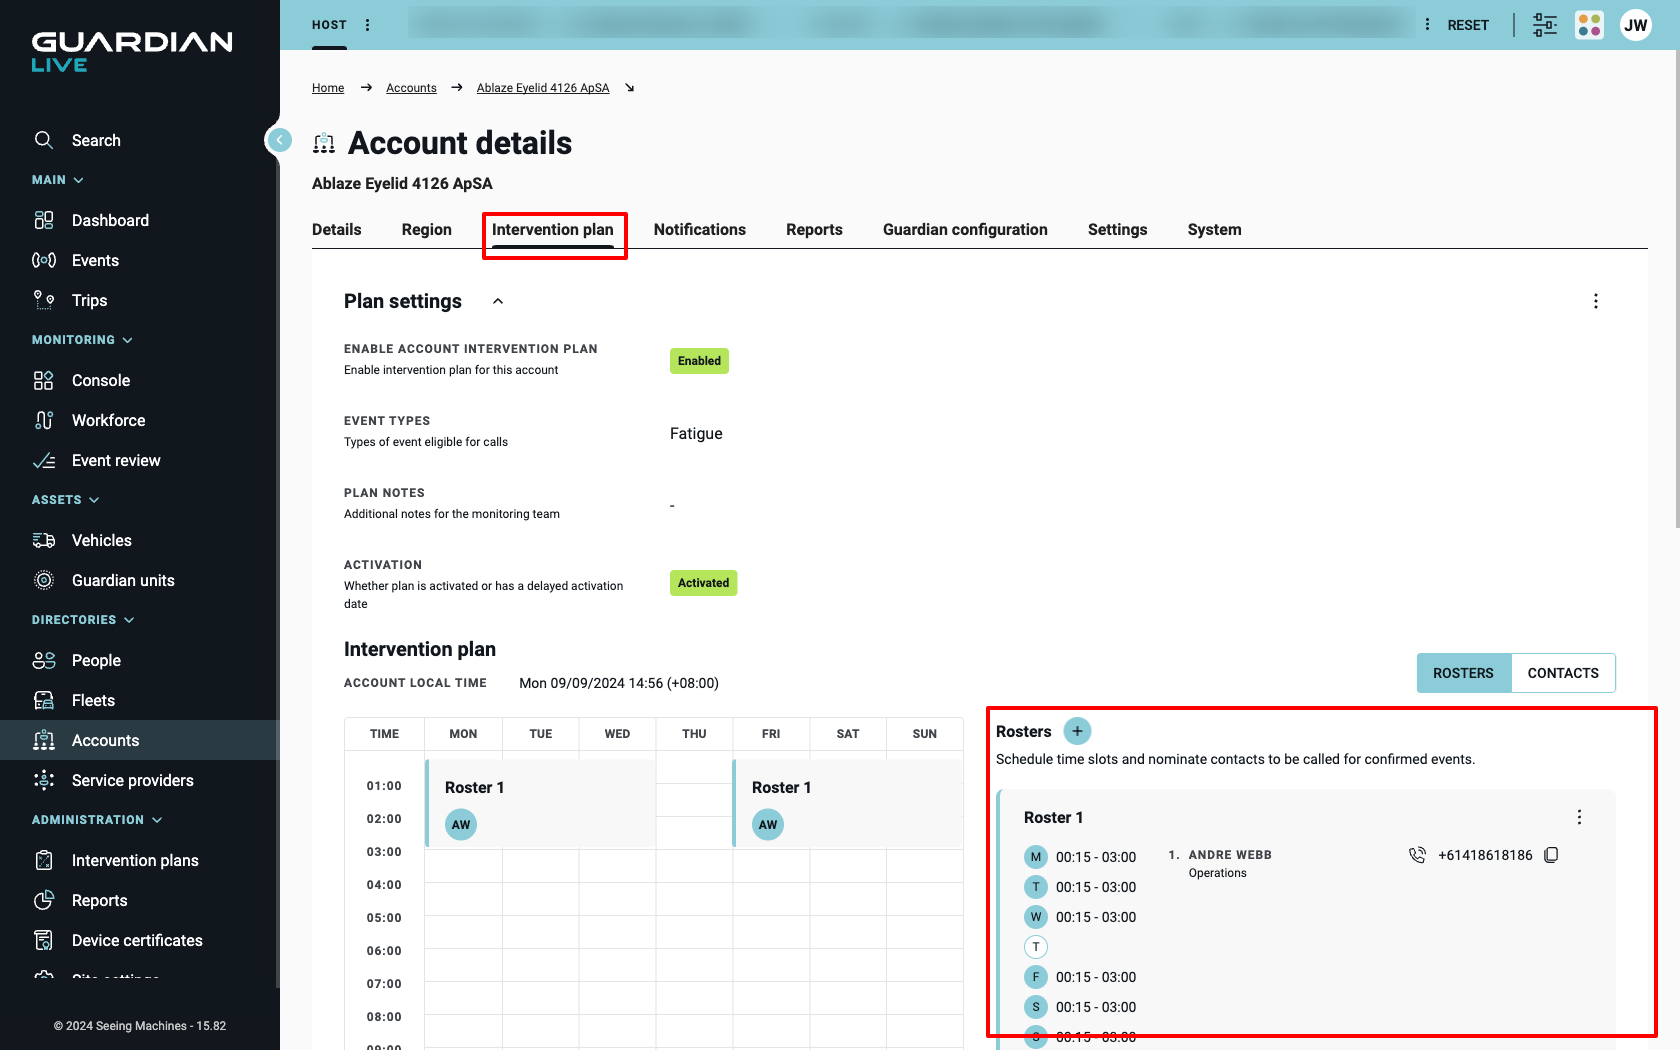
- From the “Account Details” page, navigate to the “Intervention plan” tab.
- The page has two sections, “Plan settings” and “Intervention plan”.
- Scroll to “Invention plan”. Here you should see a calendar and a list showing the rosters (if any) associated to the plan.
For each contact, their phone number will be displayed and the extension if there is one. If the phone number requires an extension or routing, please update this information in this person’s “User details” page.
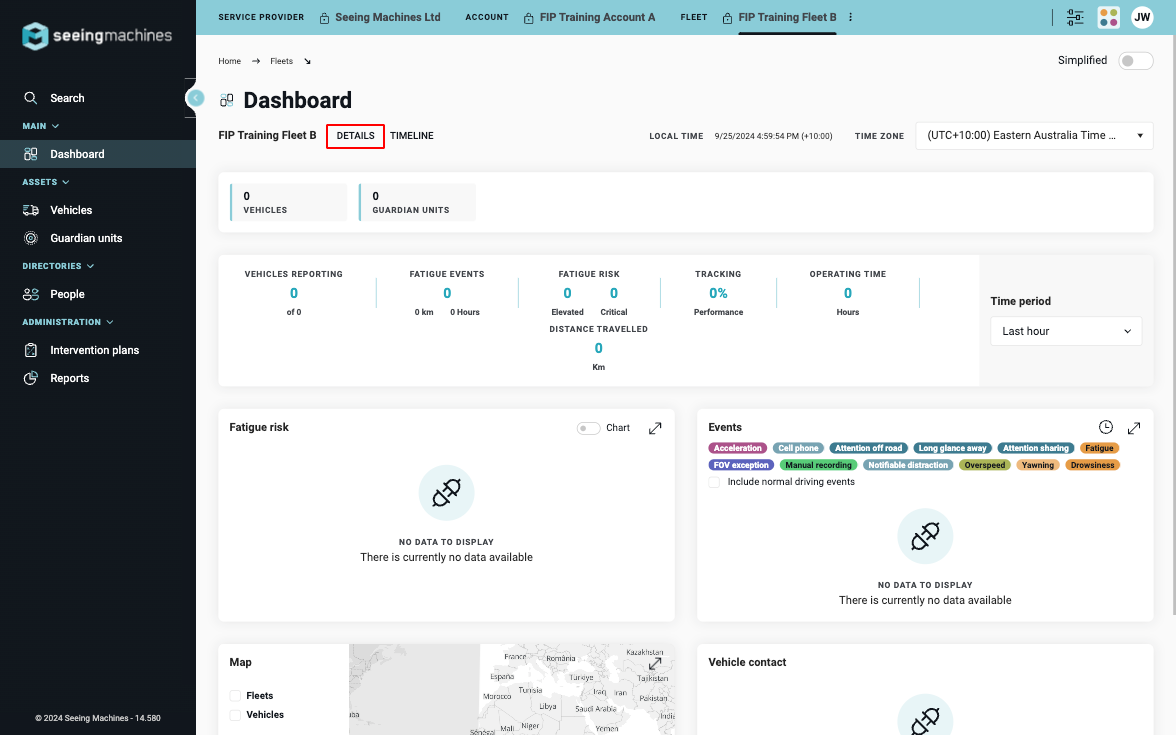
View a Fleet’s rosters
Fleet rosters are visible to Host, Service provider or Account scope and admin or elevated grant.
- From the “Fleet details” page, navigate to the “Intervention plan” tab.
- Within the “Intervention plan” tab, there are two sections; “Plan settings” and “Invention plan”.
- Scroll to “Invention plan”. Here you should see a calendar and a list showing the rosters (if any) associated to the plan.
For each contact, their phone number will be displayed and the extension if there is one. If the phone number requires an extension or routing, please update this information in this person’s “User details” page.

View your own Account or Fleet roster
(Account or Fleet scope + admin or elevated grant)
- Navigate to the “Dashboard”.
- Under the heading “Dashboard”, you should see the Account/Fleet name followed by a “Details” button.
- Tap “Details” to open the “Account details”/“Fleet details” page.
- From this page, select the tab called “Intervention plan”. [ ! ] Note: This is only visible to accounts with a “pro” or “max” service tier.
- Within the “Intervention plan” tab, there are two sections; “Plan settings” and “Fleet Invention plans”.
- Scroll to “Invention plan”. Here you should see a calendar and a list showing the rosters (if any) associated to the plan.
Add roster
[ ! ] Note: Only users with an administrator grant can add or edit rosters.
To add a roster…
-
Navigate to the “Intervention Plan” tab and scroll down to “Intervention plan” section.
-
To the right of the calendar you should see a heading, “Rosters” and a blue “+” button.
-
Tap the blue “+” button to add a roster. Follow the steps 1 and 2 to “Add roster”.
- [ ! ] Note: It is recommended that you add your contacts to the Account or Fleet prior to creating the roster. Ensure a telephone number is recorded in primary telephone so that the contact can be reached. Also check the user’s scope is correct. For contacts within an account plan they will need at minimum account scope. For a fleet, the contact should have account or fleet scope.
Step 1 – Details
-
By default, the roster will be given an automated name. If required, this name can be changed. The roster name will appear in the calendar and within a user’s intervention plan subscriptions. Roster names must be unique.
-
Provide a start and end time for the roster. The timezone shown in the plan will reflect the timezone of the Account or Fleet where it’s being created.
- [ ! ] Important note: When setting up the roster, you do not need to specify the time ending as XX:59 or starting at XX:01. The system will allow you to can create the roster up to XX:00 and have another roster start at XX:00 and it would not be considered an overlap. Leaving it ending in the last minute of the hour or starting one minute after the hour will only result in a loss of coverage for that minute (no one gets called if an event happens in that minute)
-
The duration will populate automatically and is the period between the start and end.
-
By default, all days of the week are selected. Deselect the days this roster should not apply. The roster will update on the calendar for you to preview.
-
[ ! ] Note: Multiple rosters can exist in a plan but their times cannot overlap. The application has validation to let you know if there is an overlap.
Step 2 – Contacts
Contacts are the people the monitoring centre analysts will call when an event has been confirmed. Each roster must have a minimum of one contact.
A contact can be added by:
-
A) Selecting the input field and starting to type their name.
-
B) Or, tap the “+” button within the input field. This will open the “Add contact” modal. Select a contact from the list and tap “Add” to close to the modal.
Repeat this process to add the second and third contact if required.
The contacts can be re-ordered. To change the order, drag and drop the contact by using on the drag icon (6 dots). The sequence displayed here determines the order in which monitoring centre analysts will attempt to contact the individuals.
Tap “save” to add the Roster to the plan.
The Roster will appear within the calendar and on right hand side under “Rosters”.
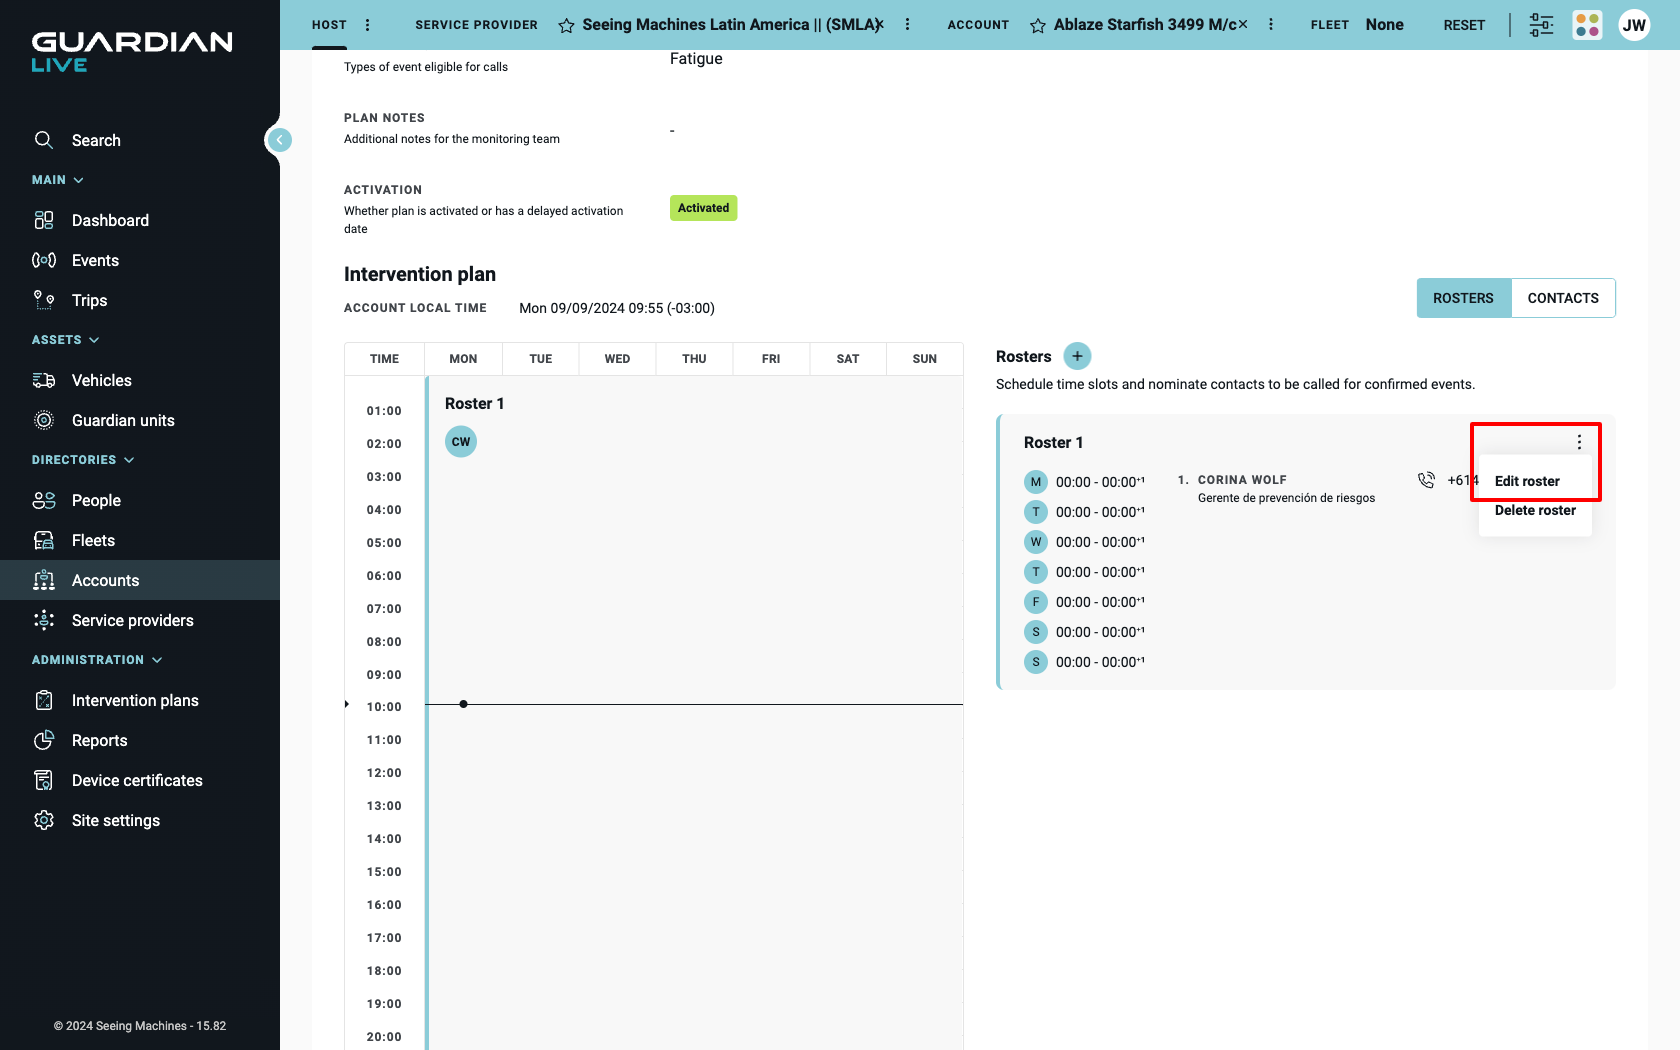
Edit roster
[ ! ] Note: Only users with an administrator grant can add or edit rosters.
To edit a roster…
- To the right of the calendar you should see a heading, “Rosters”. Under this heading you find will your rosters.
- Find the roster you want to update and tap the menu denoted by the three dots.
- Select “Edit roster” from the menu.
- Make changes to the details or contacts as required.
- The time slot can be changed but cannot overlap with an existing roster.
- The roster must have at least one contact.
- To abandon changes tap the “x” in the right hand side of the “Edit roster” card.
- From step 2, “Contacts” select “save” to confirm changes.
- For plans that are “Enabled”, any changes to rosters will be active immediately after saving.

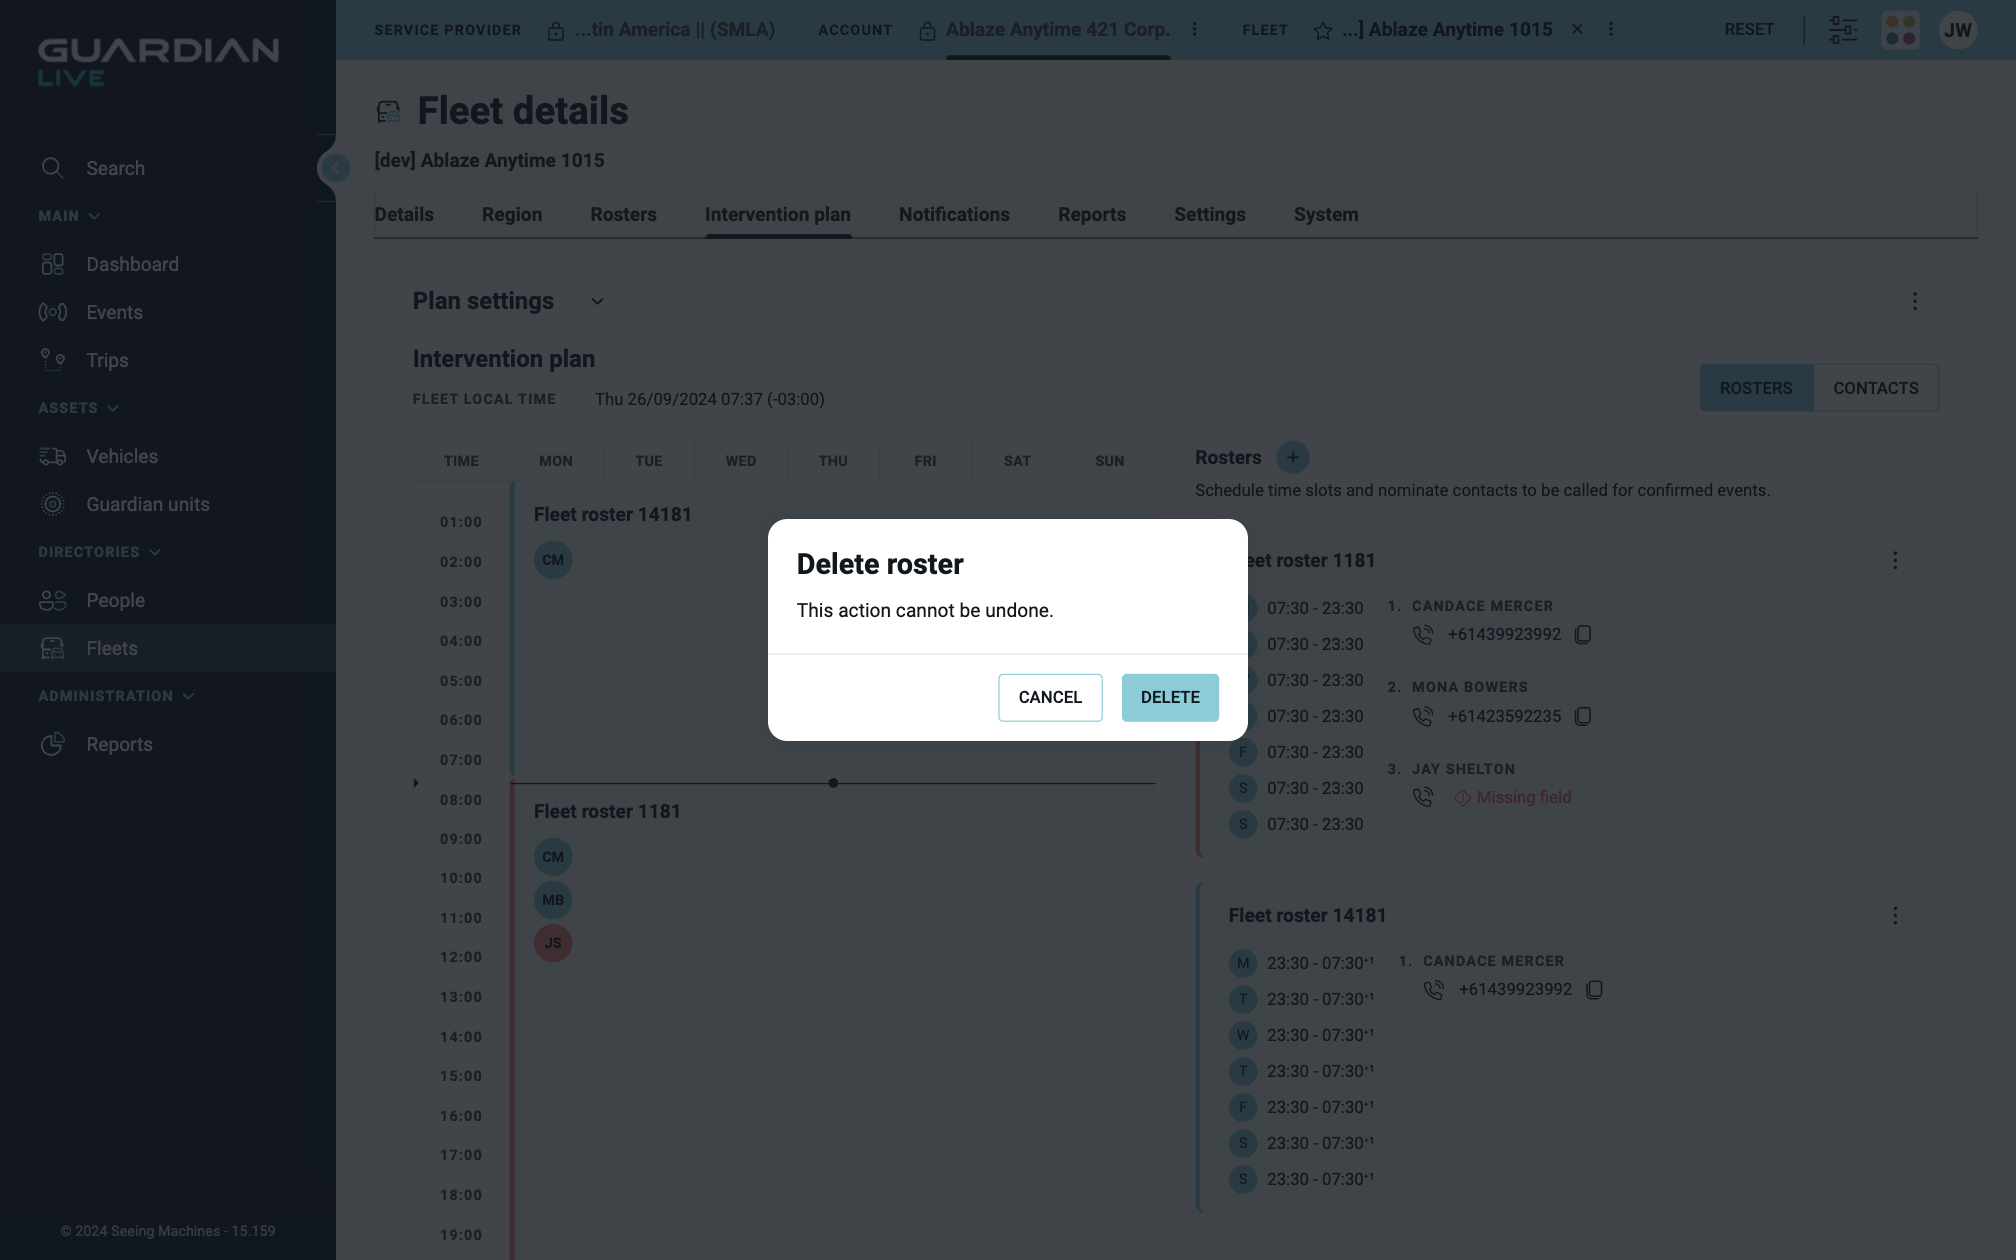
Delete roster
When a roster is deleted, contacts will no longer be called during that period. Please consider the impacts of deleting a roster before proceeding.
Rosters within Account plans could be used by a number of Fleets. If you accidentally delete a roster, a new one can be created using the “Add roster”, see earlier.
[ ! ] Note: Only users with an administrator grant can delete a roster.
To delete a roster…
- To the right of the calendar you should see a heading, “Rosters”. Under this heading you will find your rosters.
- Find the roster you want to delete and tap the menu denoted by the three dots.
- Select “Delete roster” from the menu.
- A “Delete roster” confirmation dialogue will open. Review the text and tap “delete” to confirm or “cancel” to keep the roster.
- After selecting “delete”, the roster will be removed from the calendar and the list.
- The roster will also be removed from the contact’s ‘intervention plan’ subscriptions.

View roster contacts
To view a list of contacts within the roster…
Within the Intervention plan section, the switch to “Contacts”.
This should load a list of all of the contacts across each roster in the plan.
For each contact, the list will display:
-
Their name and role (if specified)
-
The total hours they are allocated in this plan. E.g. If they are in 5 hours for Roster 1 and 10 hours for Roster 2, this would say “15 hours”.
-
The names of the rosters this user is allocated.
-
A “link to” open the user’s intervention plan subscriptions page.
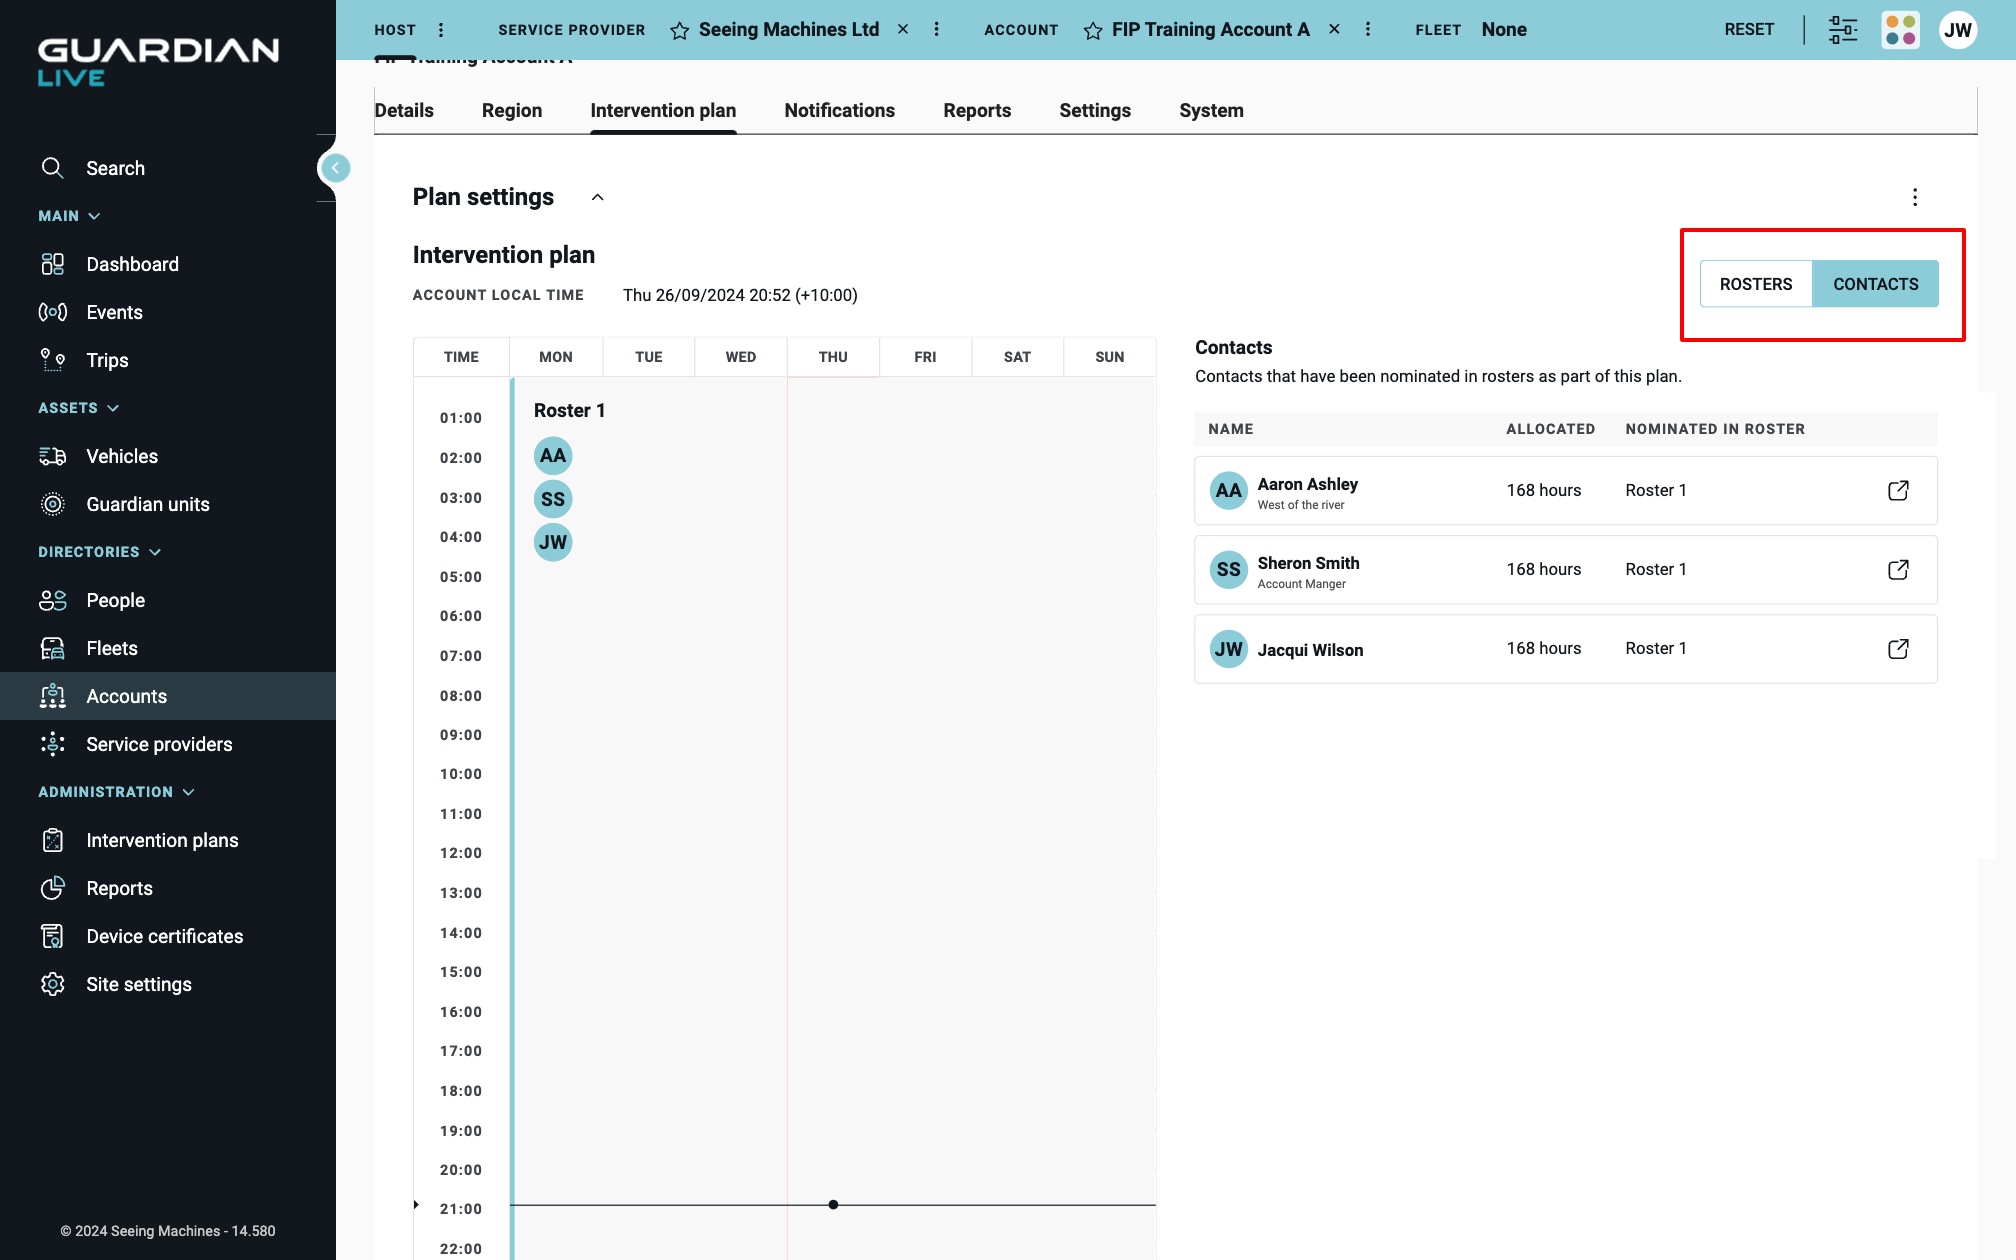
An administrator can use this feature to understand which Intervention Plans and Rosters someone is subscribed to.
A FIP contact can use this feature to understand when they might be contacted for a roster.
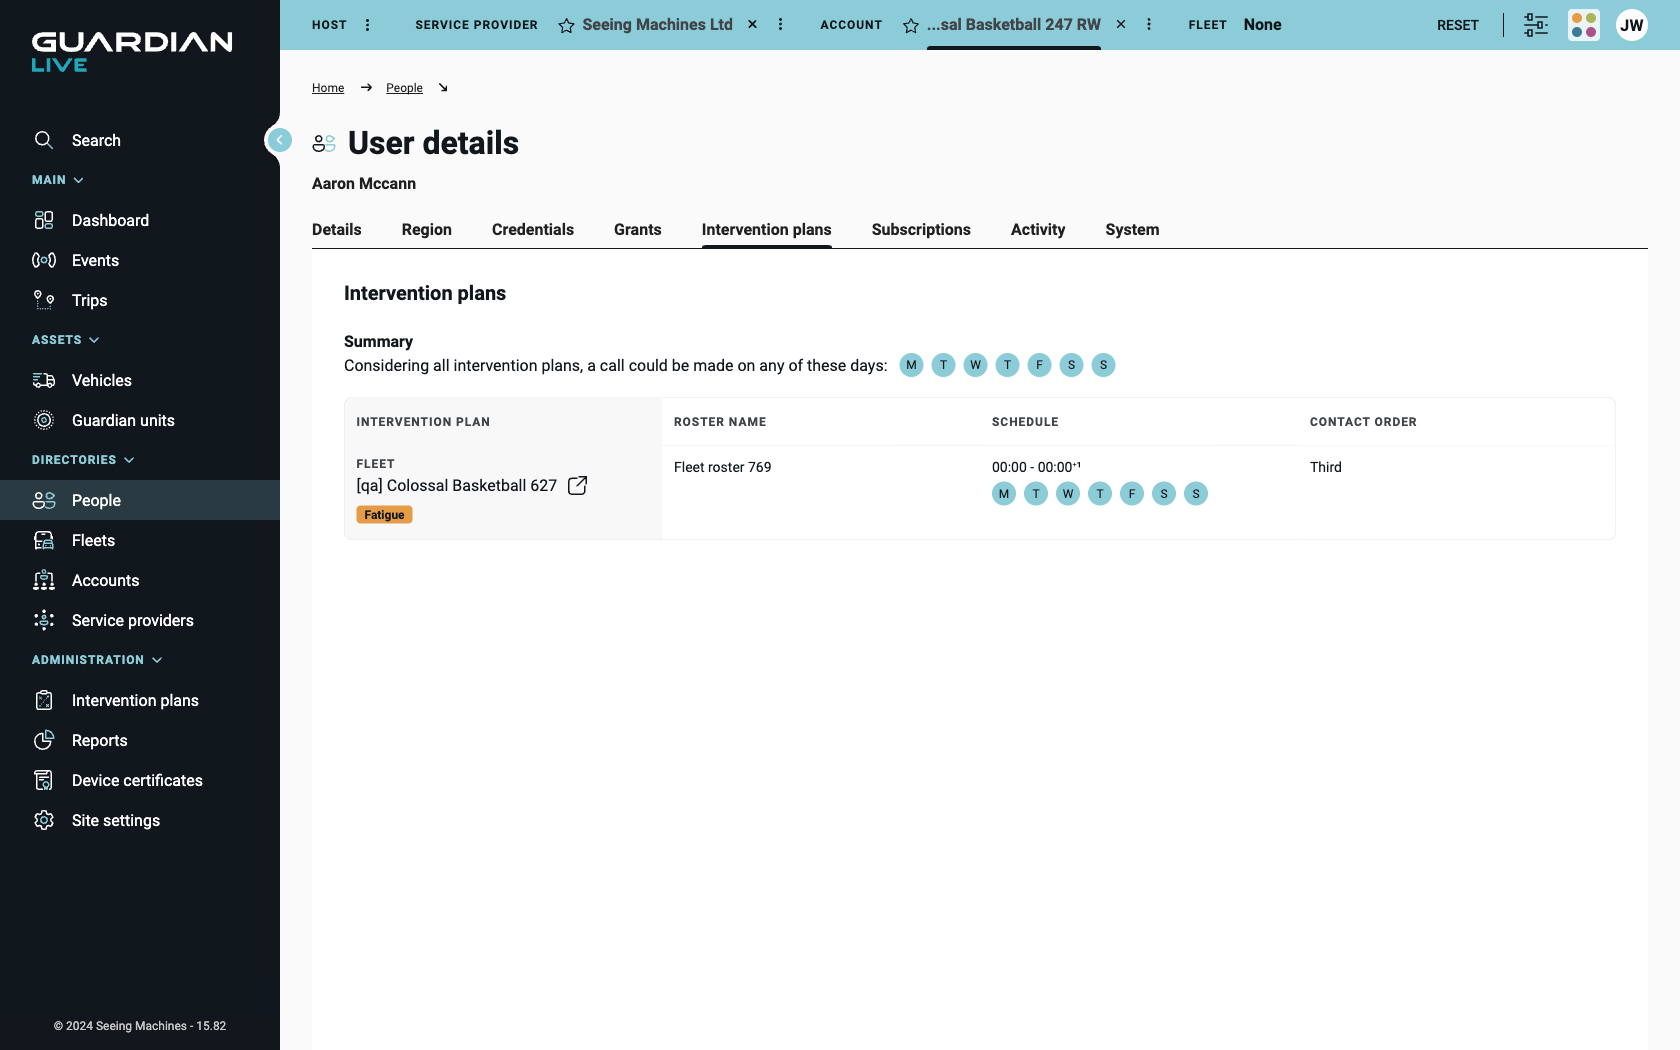
View someone’s Intervention plan subscriptions
To view someone’s Intervention plan subscriptions…
-
Navigate to the “People” page.
-
Search or filter for the user you want to view. Select their name to open the “User details” page.
-
Navigate to the “Intervention plan” tab.
Here you will see information about the Intervention Plans a user is contactable for.
The table provides information to explain:
-
An aggregated view of which days they could be called.
-
The tenant (Host/Service Provider/Account/Fleet) the plan belongs to.
-
The Roster/s the user is subscribed to.
-
The time slots of when they could be called.
-
Whether could be called first, second or third.
Depending on your permissions, you will see a jump-to icon which will open the Intervention plan in a new tab.
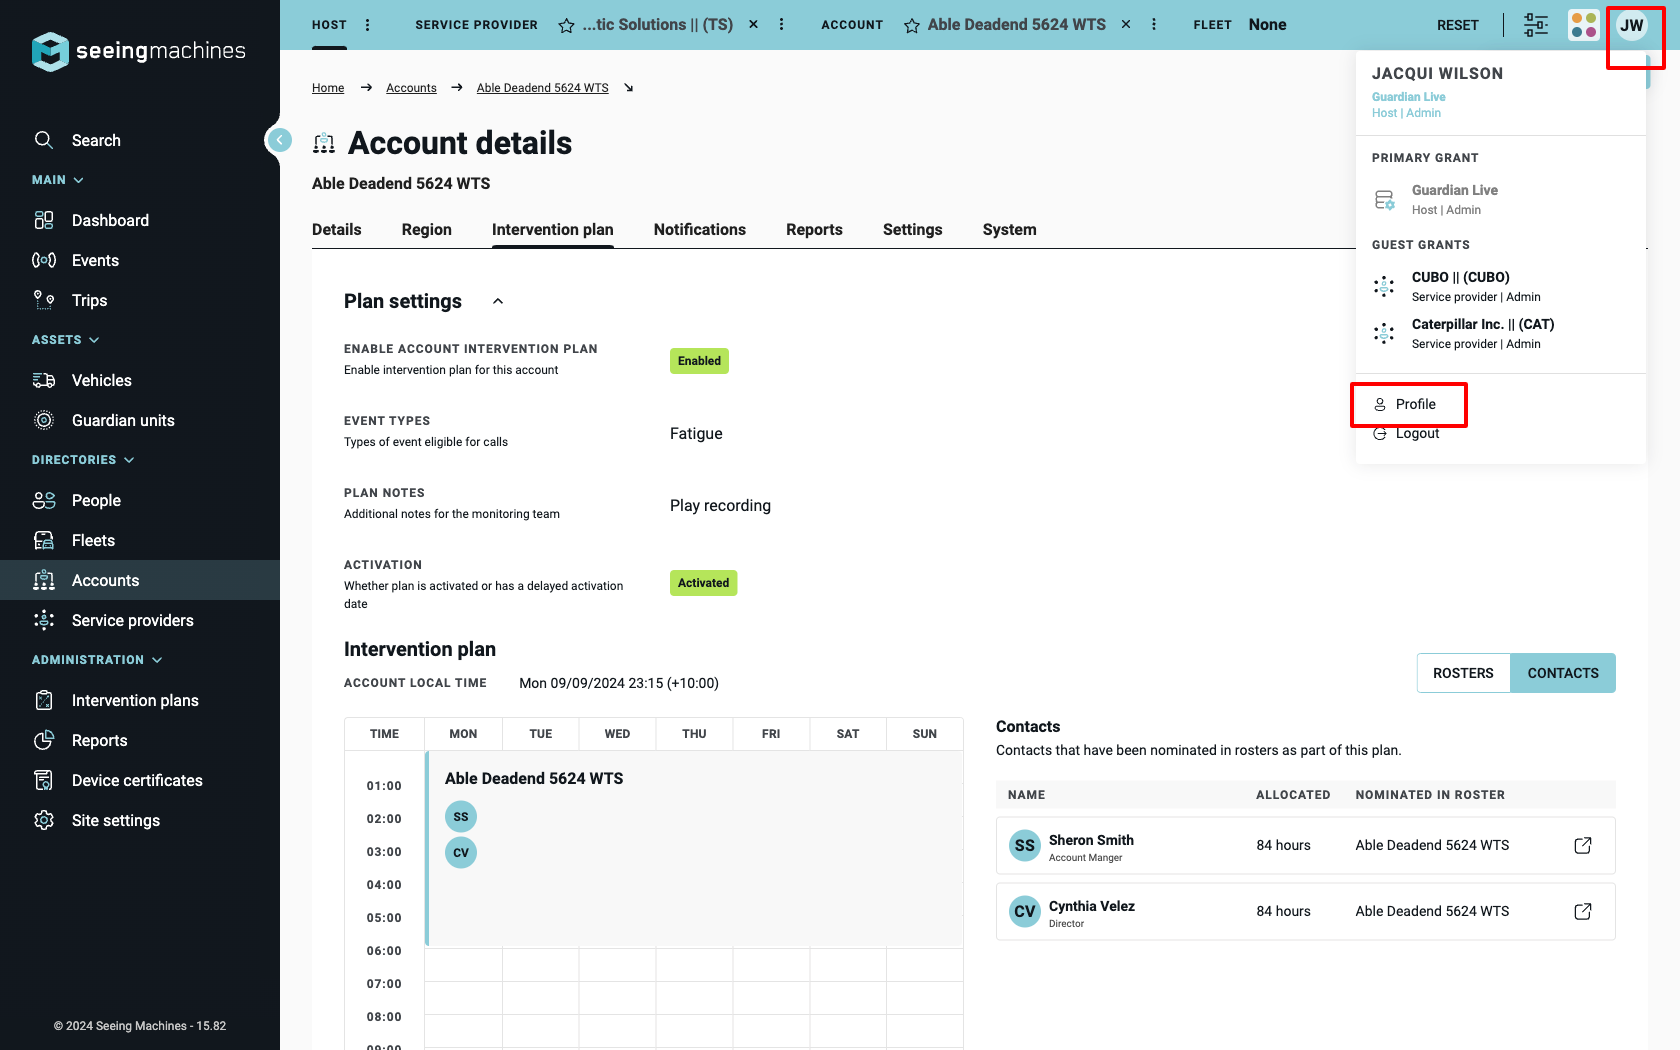
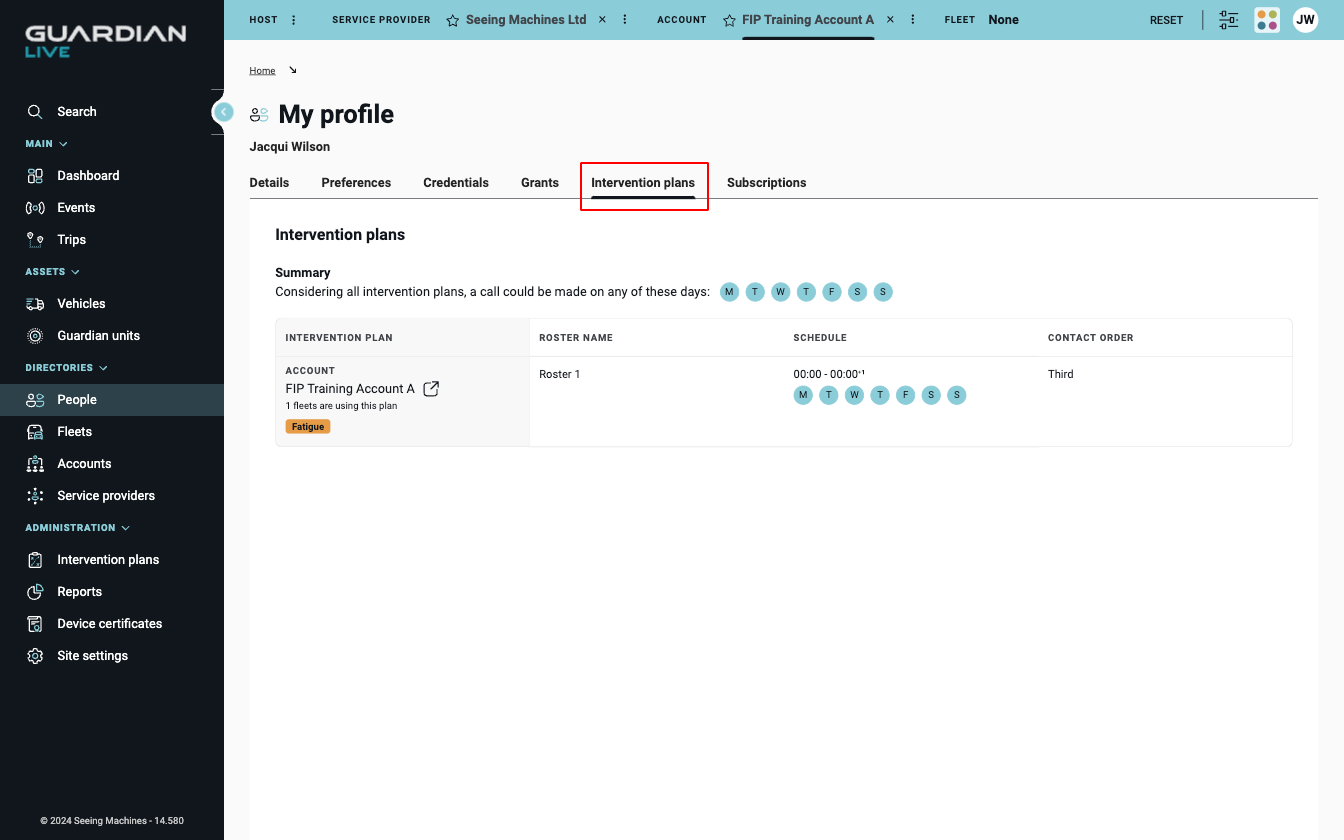
View your own Intervention plan subscriptions
To view your Intervention plan subscriptions…
-
Navigate to your profile by tapping your initials / avatar in the top right hand side of the page.
-
Select “Profile” to open the “My profile” page.
-
Navigate to the “Intervention plans” tab. Here you will see which plans and rosters you are assigned to.